Vitezovi MiG-29 MFD Pilot Manual
How to fly with the Vitezovi MiG-29 MFD add-on v1.8.5: one MFD with situational awareness, navigation, intercept, fuel, stores and RWR pages, on top of KRN MODS' MiG-29A(M) Cockpit Modernization.
Before you fly
You need two things installed before the add-on: the DCS MiG-29A Fulcrum module and KRN MODS' "MiG-29A(M) Cockpit Modernization" V1.0.3, unzipped into Saved Games\DCS\Mods\tech as KRN describes.
Download KRN's mod from its release page: MiG-29A(M) Cockpit Modernization on DCS User Files.
Install
- Close DCS.
- Unzip the add-on anywhere (not into the Mods folder) and double-click
INSTALL.bat. - The installer finds KRN's mod, checks it is V1.0.3, keeps a copy of every KRN file it changes and installs the add-on. If it reports a problem, it has changed nothing.
- As its last step the installer offers to build the moving-map textures from your DCS charts (it shows size and time per map and asks yes or no; see SA page).
- In DCS: Options > Special > MIG-29AM, keep KRN's own MiG29 box ticked.
Units: the MFD uses the units you chose for the jet itself, Options > Special > MiG-29 > Avionics Units: Imperial gives NM, feet, knots and pounds, Metric (Native) km, metres, km/h and kg. See Options, settings and troubleshooting to set it for the MFD alone.
Remove: double-click UNINSTALL.bat. KRN's original files come back and KRN's mod works on its own.
If the installer says KRN's files are not originals (another KRN version, or the old all-in-one Vitezovi package): delete KRN's folder, unzip KRN's mod again, run INSTALL.bat again.
HOTAS binds: INSTALL.bat also adds every MFD and UFCP button of the add-on to the MiG-29's own controls: Options > Controls > MiG-29, category Vitezovi MFD (64 controls: POWER, all bezel buttons, BRT, DAY / NIGHT, SYM, the UFCP keypad, MRK / DIR / NAV, the STP switch, KRN's other UFCP buttons and, since v1.8.5, SRS radio 2 / 3 channel and volume up / down). A bind does exactly what a click on the button does. A DCS update or repair takes them out of the list again: run INSTALL.bat again (the start-up test then shows NO HOTAS BINDS on the UFCP LINK line); your own assignments come back with them. With DCS under C:\Program Files, right-click INSTALL.bat > Run as administrator for the binds. If the installer says it did not find DCS's install folder, open a command prompt in the add-on folder and run INSTALL.bat -DcsPath "D:\DCS World" (your DCS folder).
Updating KRN's mod later: uninstall the add-on first, update KRN, then install the add-on version made for that KRN version.
Test missions (installed to Saved Games\DCS\Missions):
MiG29_DL_Test_Flight.miz: four MiG-29 slots at Kutaisi plus dynamic spawn.MiG29_RWR_Test.miz: air start with a full load, an SA-6 site and an armed Su-27, for the RWR and stores pages.
Power and start-up
The MFD runs on the jet's DC power and has its own power button: the top-left rocker on the bezel, labelled PWR.
- On: press PWR once. It needs jet power (battery switch on, or a generator running).
- Off: hold PWR until the "DISPLAY POWER OFF" bar is full (2 seconds) and it reads RELEASE TO SWITCH OFF, then let go: the display switches off when you release. Let go before the bar is full and nothing happens.
- Hot start and air start: the MFD is already on.
- Cold start: the screen stays dark until the battery is on and you press PWR.
- UFCP: comes on with the Aircraft Systems Supply switch on the System Power Panel (battery or ground power on first). It takes a few seconds to come on and to go off.
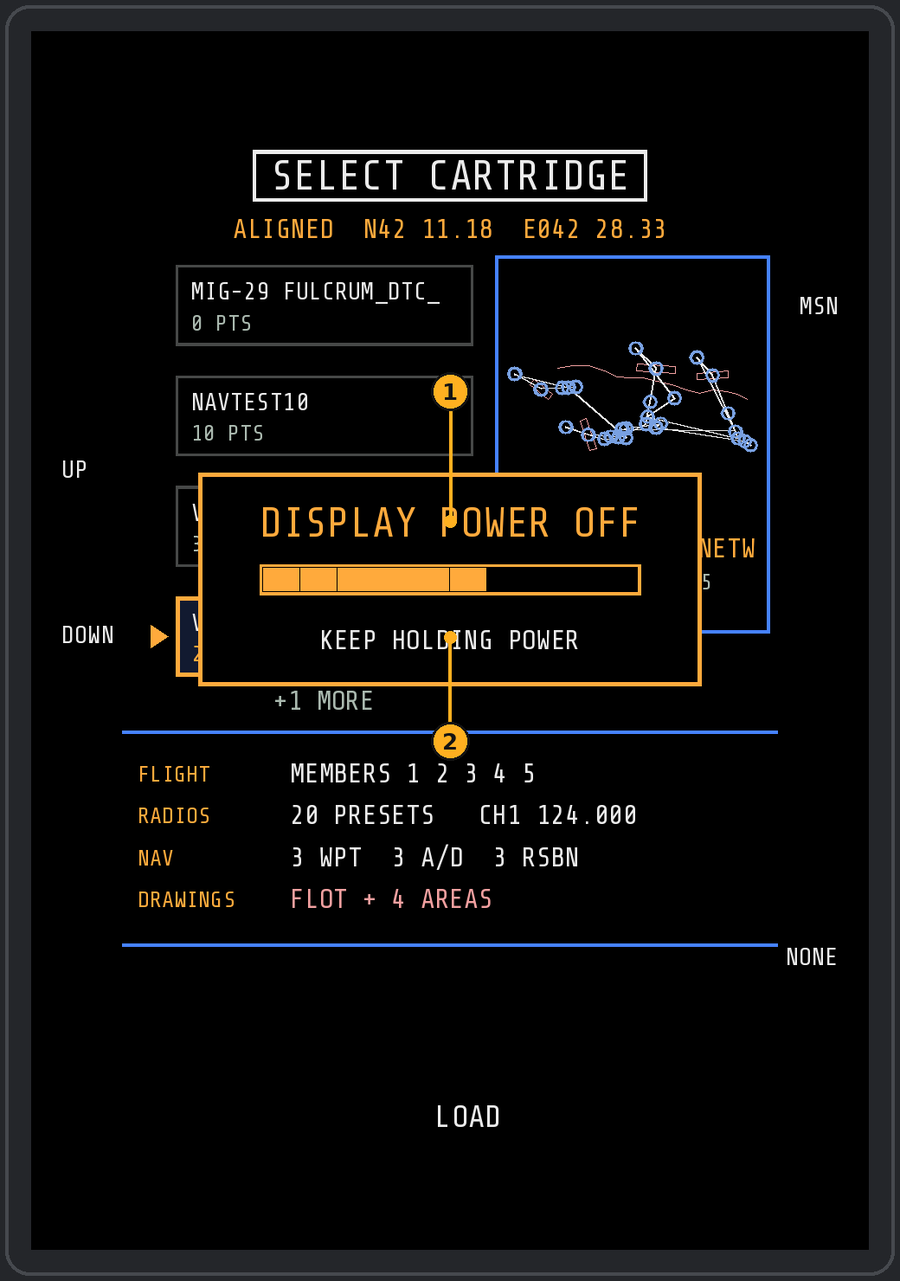
- Shown while you hold PWR; the bar fills over 2 seconds. When it is full it reads RELEASE TO SWITCH OFF, and the display switches off when you let go.
- Let go before it is full and nothing happens.
The start-up (about 16 seconds)
- Screen test: a short flash, then a test grid with grey steps.
- Boot ROM: the display's own hardware check in small text.
- Software boot log: each check ticks in with its boot clock, then a loading bar.
- Squadron badge with the program version and a start-up bar.
- BUILT-IN TEST checklist: every line goes from IN TEST to GO (white) or NO-GO (red). The right column shows real values: DC volts, your latitude and longitude (the nav alignment), datalink tracks, SPO-15, stations and the number of cartridges. Bottom-centre SKIP shows the result at once.
- SELECT CARTRIDGE: see below. Then the MENU page.
NO-GO lines are information, not faults of the add-on: NAV / POSITION without a position, DATALINK RECEIVER without datalink packets (export off on a server, for example), GCI / BULLSEYE without a bullseye in the mission.
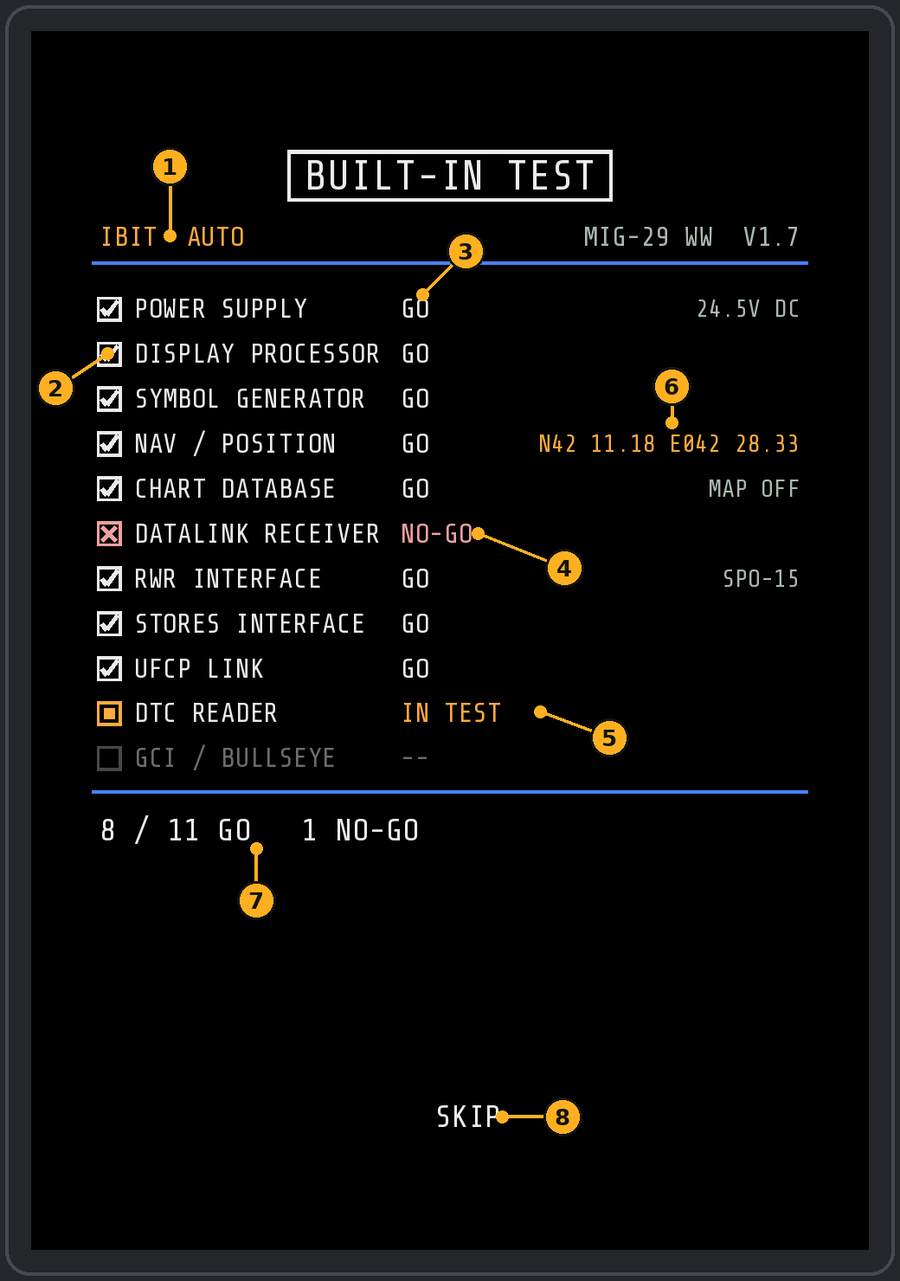
- Test mode and the add-on's version.
- Check box: tick = GO, red cross = NO-GO, amber square = running now, empty = still waiting.
- Result of each line.
- A NO-GO line (here: no datalink packets yet).
- The line being tested right now.
- Your position from the nav alignment, latitude and longitude.
- Summary: lines passed and failed.
- SKIP: show the whole result at once.
Choosing a cartridge
The cartridges for the current map are listed as cards. The selected card is gold, with a preview of its route, points and drawings on the right and what it holds below (flight members, radio presets, waypoints, airfields, RSBN, drawings).
| Button | Does |
|---|---|
| Left 2 UP / left 3 DOWN | Select a cartridge |
| Bottom centre LOAD | Load the selected cartridge |
| Right 1 MSN | Use the mission plan instead |
| Right 5 NONE | No flight plan |
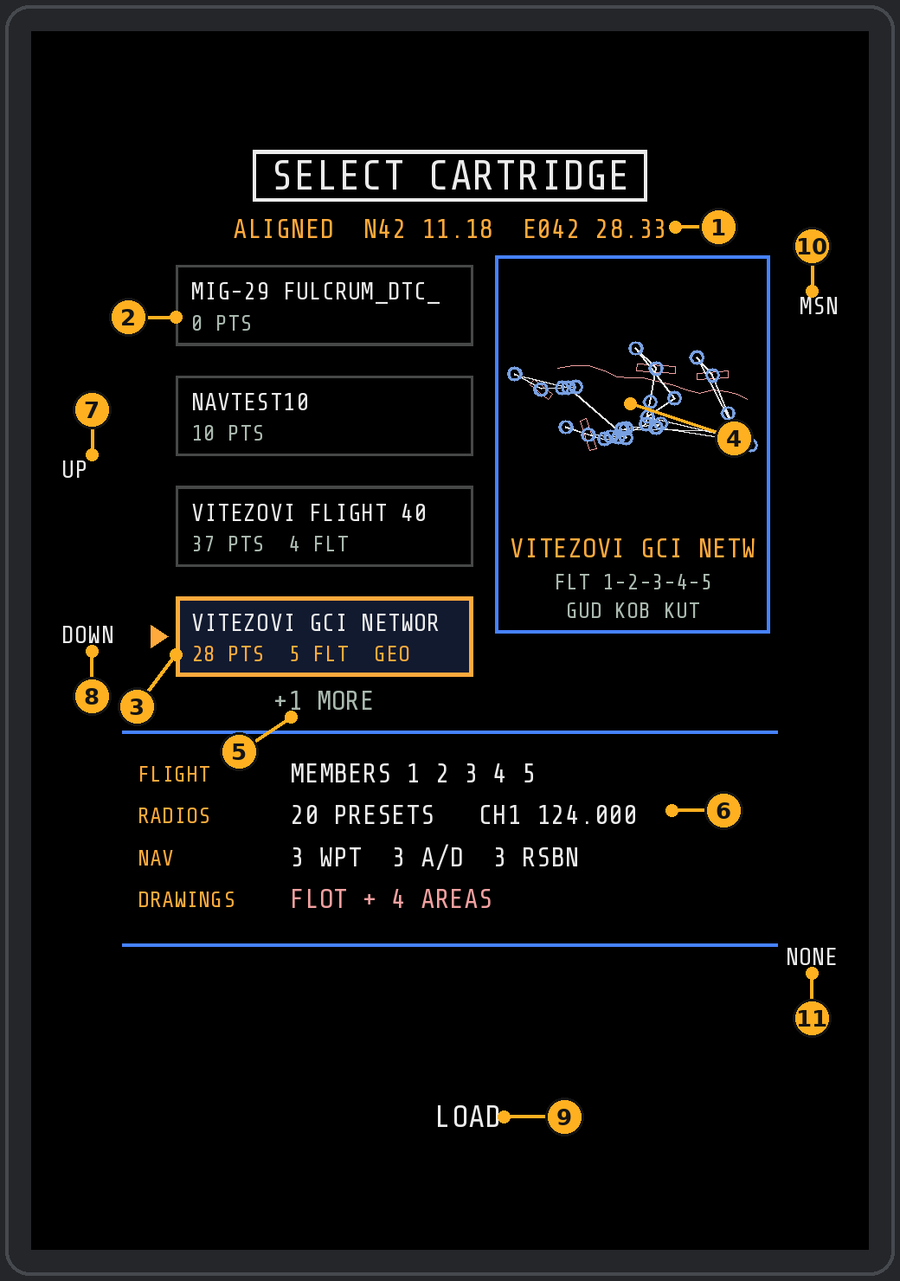
- Your aligned position.
- The cartridges for this map, one card each, with points, flight members and GEO when it has drawings.
- The selected cartridge: gold, with the pointer.
- Preview of its route (white), points (blue) and drawings (pink).
- More cartridges below; UP and DOWN scroll to them.
- What it holds: flight members, radio presets, waypoints / airfields / RSBN, drawings.
- UP (L2).
- DOWN (L3).
- LOAD (bottom centre): load the selected cartridge.
- MSN (R1): use the mission plan.
- NONE (R5): no flight plan.
You can change cartridges later on the NAV page (right 1 LOAD).
Power cuts
- Under 1.5 seconds: the screen goes dark and comes back on the same page.
- 1.5 to 30 seconds: the start-up runs again without the cartridge choice; your plan, route edits and steerpoint stay.
- 30 seconds or more (engines and battery off for a rearm, for example): with PWR still on, the full start-up runs again as soon as power returns, cartridge choice included.
The bezel
The five controls that never change
| Control | Where | Does |
|---|---|---|
| PWR | Top-left rocker | Press = on; hold 2 s, then release = off |
| MENU | Bottom centre | Back to the MENU page from any page |
| BRT | Top-right rocker | Left click brighter, right click darker |
| SYM | Bottom-left rocker | SA page declutter: left click less, right click more |
| D/N | Bottom-right switch | Left click day, right click night colours |
Everything else changes with the page: read the label printed beside a button before you press it. Buttons with no label do nothing on that page.
MENU and moving between pages
The MENU page (squadron badge, fuel and datalink status at the bottom) is the hub: every page is one button away, and the bottom-centre button brings you back to it from anywhere.
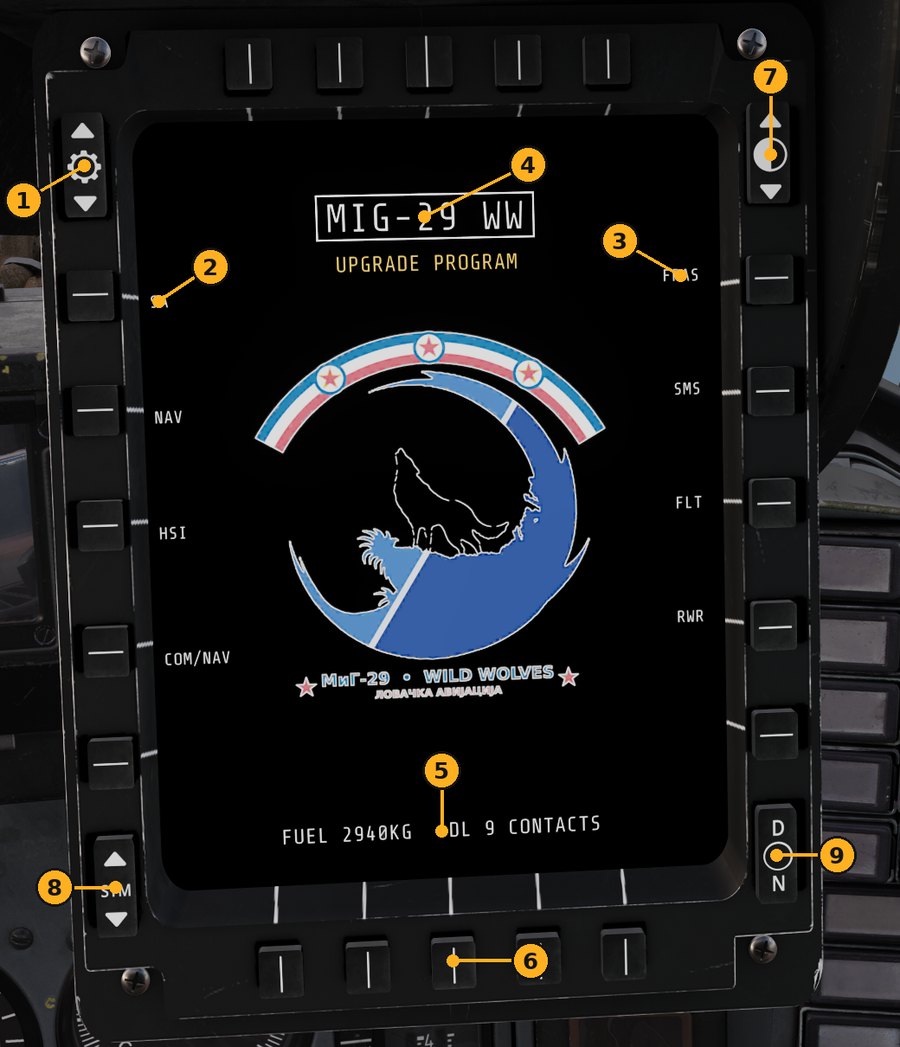
- PWR rocker: press = on, hold 2 s and release = off.
- Left page buttons (SA, PIC, NAV, HSI, COM/NAV).
- Right page buttons (FPAS, SMS, FLT, RWR, LOFT).
- Page title.
- Status line: fuel and datalink state.
- MENU (bottom centre): back to this page from anywhere.
- Brightness rocker.
- SYM rocker (symbol brightness).
- D/N switch: day / night colours.
| Left | Page | Right | Page |
|---|---|---|---|
| 1 | SA | 1 | FPAS (fuel and engines) |
| 2 | NAV | 2 | SMS (stores) |
| 3 | HSI | 3 | FLT (your flight) |
| 4 | COM/NAV | 4 | RWR |
- Bottom centre (MENU): to the MENU from any page. Pressed on the MENU, it takes you back to the page you came from.
- UFCP NAV button: straight to the NAV page; again = back.
- SA page right 2 PIC: the PICTURE page.
- MISSILE LAUNCH and BINGO FUEL alerts show on every page.
SA page
The SA page is a heading-up picture around your jet in the style of the F-15 SIT page: datalink contacts, ground threats, your route, markpoints and the cartridge's drawings, optionally over DCS's own charts.
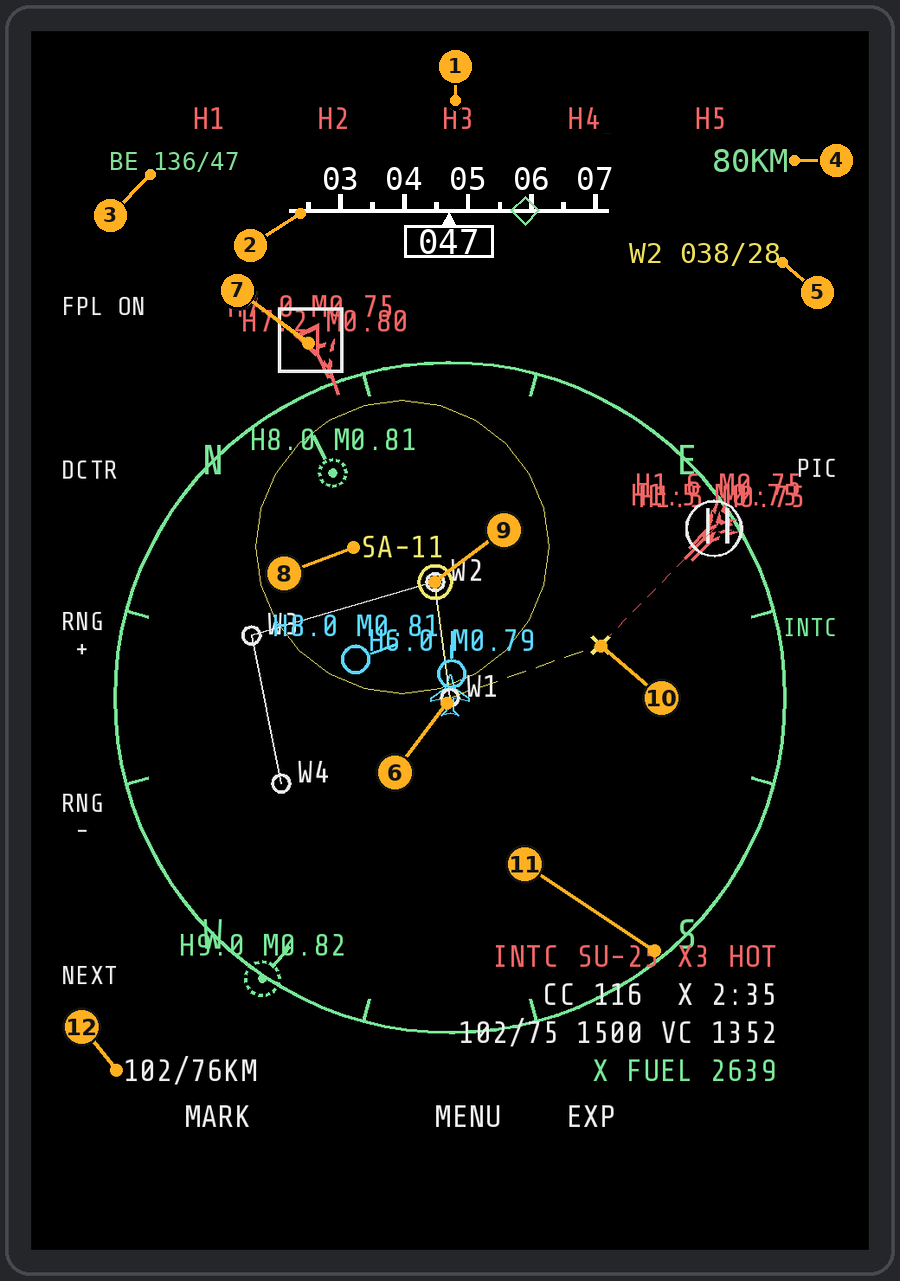
- H1–H5: cursor to the nearest to 5th nearest hostile contact on the page.
- Heading tape: your heading boxed under the caret, numbers every 10° (04 = 040). While INTC runs, the diamond on it is the heading to steer (amber at the end = more than 25° to turn).
- Your own bullseye position (BE bearing/range).
- Range scale. Its unit (KM or NM) goes for every distance on the page.
- Active steerpoint: name, bearing and range.
- Your jet.
- Cursor box on a contact.
- SA-11 threat ring.
- Route waypoints.
- INTC meeting point (X).
- INTC readouts: heading, time and range to the meeting point.
- Bearing and range from you to the cursor.
| Button | Does |
|---|---|
| Left 1 FPL | Flight plan route on / off |
| Left 2 DCTR / CNTR | Move your jet low on the screen to see further ahead, and back |
| Left 3 / 4 RNG + / - | Range 20, 40, 80, 160, 320 km |
| Left 5 NEXT | Cursor to the nearest contact, then the next one |
| Top H1 to H5 | Cursor to the nearest to 5th nearest hostile |
| Right 1 GEO | Cartridge drawings shown (white) / hidden (grey); no label = none |
| Right 2 PIC | PICTURE page |
| Right 3 INTC | Intercept steering on / off (green while on) |
| Bottom 1 MARK / 2 DEL | Drop a markpoint / delete the newest |
| Bottom 4 EXP / NORM | Expanded view around the cursor's contact |
| Bottom 5 MAP | Moving map: MAP, MAP DIM, MAP DARK, OFF (when enabled in Options) |
Reading it
- Colours: green friendly, red hostile, yellow unknown, cyan your flight. Lines from contacts show where they are heading.
- Top left: your bearing and range from the bullseye. Top right: range scale and the active steerpoint (TO ...). An amber NO DL or DL OFF appears there only when the datalink is missing.
- Bottom right: the datablock of the contact under the cursor (bearing / range from you and from the bullseye, altitude, type).
- Red rings are ground threats seen over the datalink.
Cursor: jump to contacts with H1 to H5 (nearest to 5th nearest hostile) or NEXT.
EXP: zooms around the contact or SAM under the cursor (else the cursor point, else your jet) and follows a contact you picked. RNG + / - inside EXP zooms only the expanded view; NORM brings back your normal range, and the next EXP comes back at the zoom you used last.
Declutter (SYM rocker, bottom left): left click less, right click more, five steps: 1 FULL, 2 GROUP, 3 ALT only, 4 CLEAN (no labels, no route), 5 MIN (contacts and threats only). On 2 and 3, contacts of one colour on top of each other share one label ("3X 8 .81"), and a label that would cover another moves beside or under its symbol.
Markpoints: MARK (or the UFCP MRK button) drops one at the cursor, or under the jet when the cursor is off. Up to 5. They appear on FPAS as places to go home to.
Moving map: on by default; switch it in Options (see the last section). Charts exist for Caucasus, Syria, Persian Gulf, Sinai, Iraq, Afghanistan, Nevada, Mariana Islands, Marianas WWII, South Atlantic, Germany Cold War and Kola.
Sharpest chart near the spawn point (v1.8.5 update, 16 Nov 2026): the sharpest chart layer, shown only at the smallest range, is loaded within 300 km of where you spawn; further away that range shows the next coarser chart. This keeps the cockpit loading fast on big maps (Afghanistan: about 100 map textures instead of 257; loading all of them could hang the loading screen). Setting map_gen_radius_km (default 300, 0 = load the whole map as before).
Heading tape (v1.8.1): F/A-18 style, ±25° under the H1–H5 labels, on the SA page all the time (not at SYM 5 / MIN) and on the RWR page. settings.lua hdg_tape = false shows it on the SA page only during INTC; rwr_hdg_tape = false turns it off on the RWR page.
Map dimming (v1.8.0): the MAP button (bottom right) steps the moving map MAP, MAP DIM, MAP DARK, OFF and back to MAP; the step shows for a moment at the top of the MFD. Only the chart gets darker, the symbols stay as they are. With the D/N switch at N the chart is a little darker still. Settings: map_dim_steps (default {0, 3, 6}, tenths of black over the chart) and map_dim_night (default 2).
Map textures (v1.7.8): INSTALL.bat offers to join DCS's chart tiles of each map you have into a few big textures (it shows size and time per map and asks yes or no). With them the whole map shows at every range and the MFD page stays light. Answer no and the MFD uses DCS's own small tiles, only around where you fly; run INSTALL.bat again any time to build them, and again after a DCS update that changes the charts.
EWR picture (v1.7.8): servers that block export (the SA page shows NO DL) but send "EWR | Picture Report" and "EWR | Friendly Picture Report" text messages: the add-on reads those and draws their aircraft on the SA page, hostiles red and friendlies as friendlies, placed by bearing and range from your jet. Between reports they move along the reported heading and speed; a report is shown for 3 minutes or until the next one, and only while there is no datalink picture. Since v1.8.0 reports in metric units (km, m, km/h) are read too.
PICTURE and INTC
Both are advisory and live only on the MFD: they read what the jet and the datalink already know and never touch the autopilot, HUD, radar or weapons.
PICTURE (SA page right 2)
The contacts grouped into formations, up to five groups, nearest first. Each row shows the group, BULLS (from the bullseye) or BRAA (from you), altitude, size and type, and aspect: HOT, FLANK, BEAM or DRAG with its direction. The selected group's call is written out (for example "BULLS 045/62, 8000, HOT, HOSTILE, 2 SHIP F-16.") above a small north-up plot.
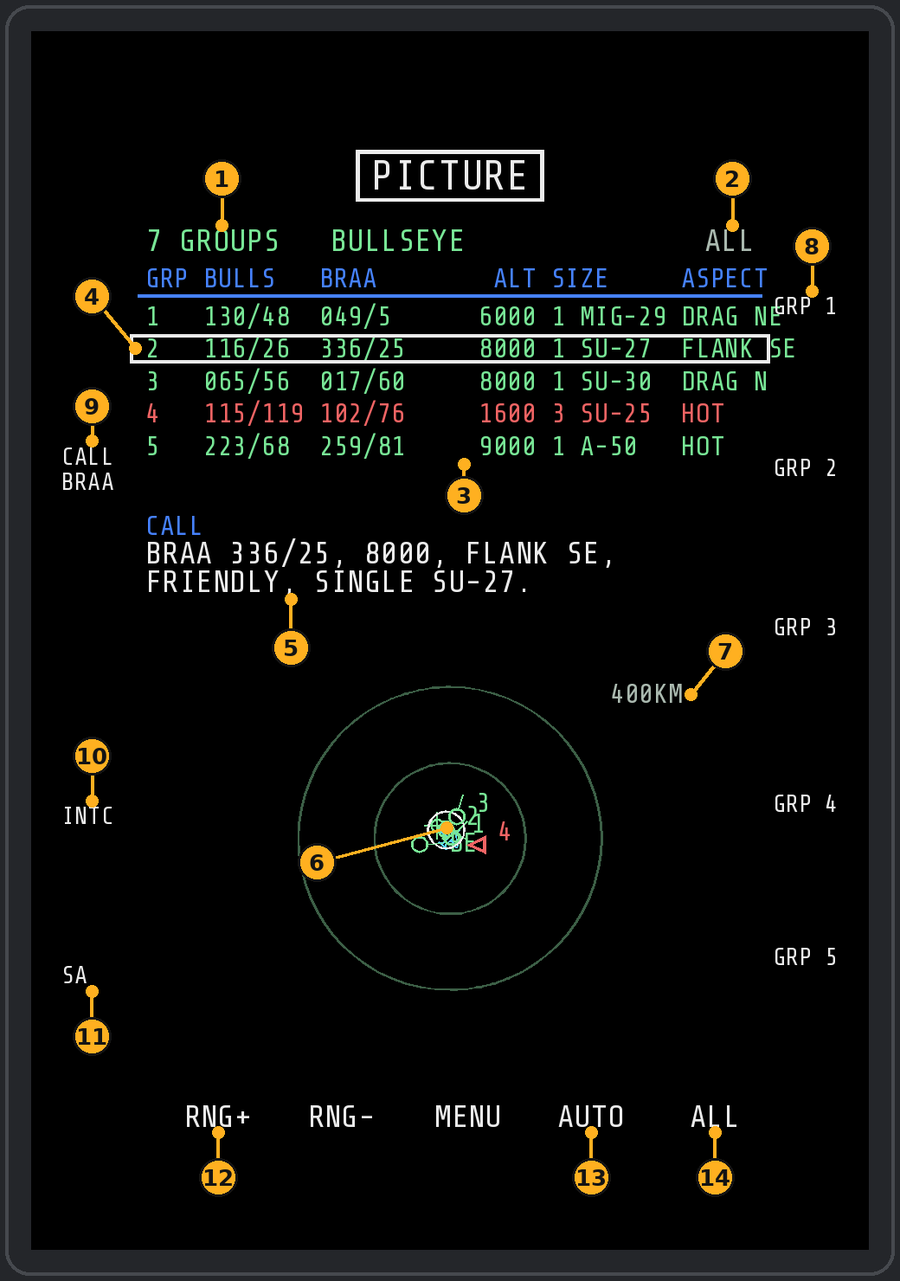
- Group count and the call format.
- SHOW filter in use.
- Group table.
- Selected group (boxed).
- The call written out, ready to read on the radio.
- Plot of the groups.
- Plot range.
- GRP buttons (R1–R5): pick a group.
- CALL (L2).
- INTC (L4): intercept the selected group.
- SA (L5).
- RNG+ (B1).
- AUTO (B4).
- SHOW / ALL (B5).
| Button | Does |
|---|---|
| Right 1 to 5 | Select a group |
| Left 2 CALL BULL / BRAA | Call format, and the plot's centre: bullseye or your jet |
| Left 4 INTC | Start intercept steering on that group, back to SA |
| Left 5 SA | Back to SA with the cursor on that group |
| Bottom 1 / 2 | Plot range + / - (25 to 400 km) |
| Bottom 4 AUTO | Plot range that fits all groups |
| Bottom 5 SHOW | Hostile / friendly / all (hostile red, friendly green) |
INTC intercept steering (SA page right 3)
Starts on the contact under the cursor, else the nearest hostile (or from PICTURE left 4). Press INTC again to stop.
- Heading tape at the very top: put the green diamond under the centre mark to fly the collision course (CC). Amber at the end of the tape = more than 20 degrees to turn.
- On the scope: a yellow X where you will meet, dashed lines from you and from the target to it, a white ring on the target (amber = track lost).
- Bottom right (in place of the cursor datablock): target and aspect, CC and time to X, bearing / range / altitude, closure, and fuel at X (amber or red against your FPAS bingo).
- TAIL CHASE: the target is faster and running, so there is no collision course; the diamond points at the target.
NAV page
NAV steers you along the cartridge's route: put the green diamond on the centre mark and you fly the command heading (CMD) that keeps you on the planned leg.
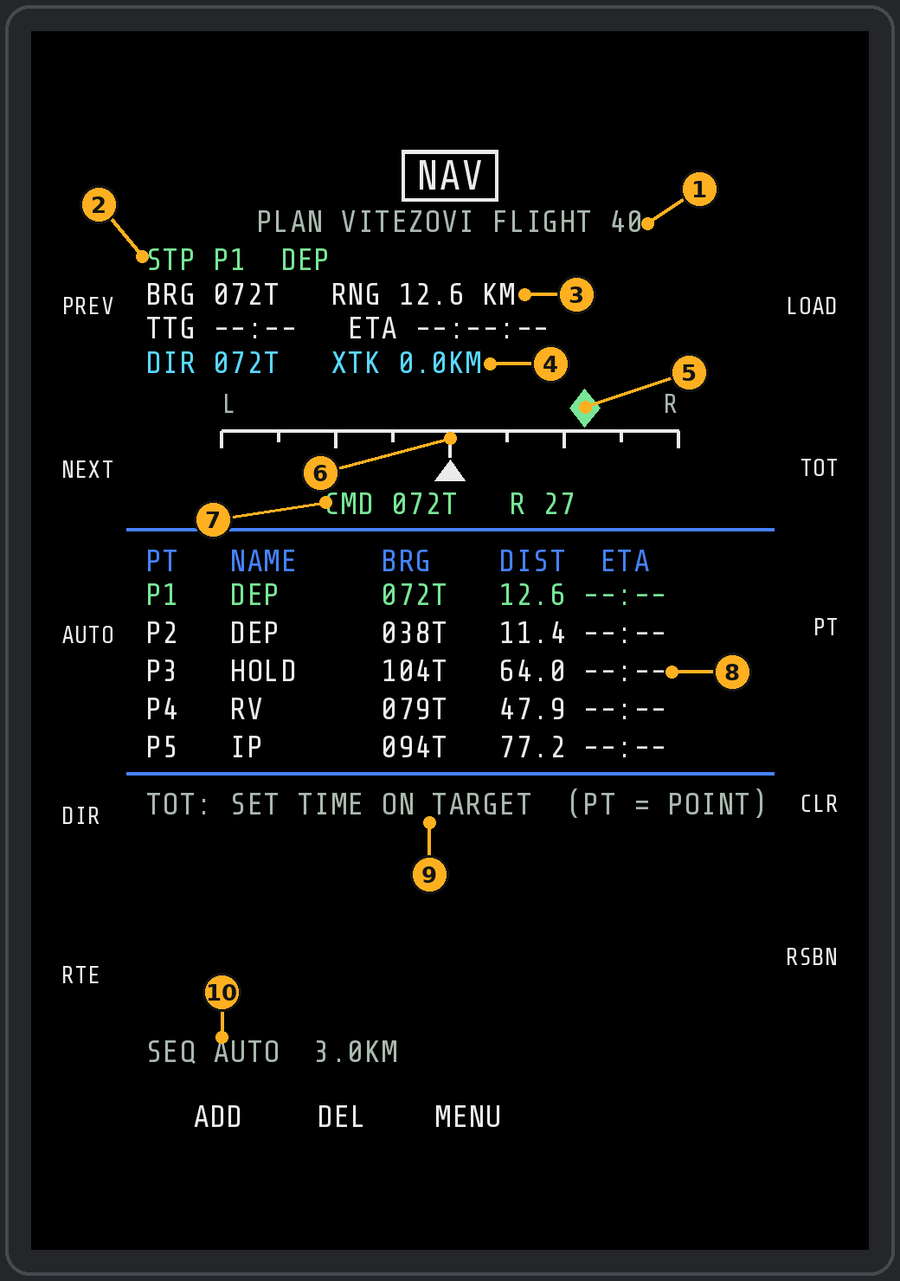
- Name of the loaded plan.
- Current steerpoint.
- Bearing and range to it.
- Direction and cross-track error.
- Steering diamond (CMD): fly it to the centre.
- Centre mark.
- Commanded heading.
- Route list.
- Time-on-target line.
- SEQ AUTO: steerpoints step on by themselves.
| Left | Does | Right | Does |
|---|---|---|---|
| 1 PREV | Previous steerpoint | 1 LOAD | Choose a cartridge, MSN or OFF |
| 2 NEXT | Next steerpoint | 2 TOT | Set a time on target (UFCP keypad) |
| 3 AUTO / MAN | Automatic or manual sequencing | 3 PT | Move the TOT cursor along the route |
| 4 DIR | Fly direct from where you are | 4 CLR | Remove the TOT under the cursor |
| 5 RTE | Pick the route to fly | 5 RSBN / TOT | Swap the bottom block |
Bottom 1 ADD adds a typed-in waypoint, bottom 2 DEL deletes the active steerpoint and bottom 4 EDIT opens the route editor.
Top block: the selected steerpoint and its note, bearing and range, time to go and ETA, the leg course (DTK) or DIR, cross-track error and the steering bar. Off the leg, CMD brings you back onto it at up to 45 degrees. All bearings are true (T) and match the SA page, HSI and UFCP.
Route list: the route you fly (the cartridge's route with your edits) plus its airfields, with bearing and distance from the jet and the ETA along the route. PREV / NEXT, AUTO and the UFCP STP switch step through every point, typed-in ones included.
Which steerpoint is active: whatever you used last wins between PREV / NEXT, the UFCP STP switch and the jet's NAV panel WP-A/D buttons. In AUTO the next point is taken when you are within 3 km or have passed abeam.
Time on target
- Right 3 PT moves the cursor (<) to the point.
- Right 2 TOT, then type the time on the UFCP keypad as HHMMSS (or HHMM, then ENT). Mission time, as on the cockpit clock.
- Set as many TOTs as you like; each leg between two TOTs gets its own speed.
- Fly the cyan caret (your ground speed) into the green box (speed needed). The THEN line shows the next leg's speed.
Fuel at the TOT point and at the last steerpoint turns amber when it is below bingo or reserve. Ground speed needs about 2 seconds after opening the page.
Member routes (RTE, left 5)
One cartridge can hold every flight member's route: in DCS's DTC editor, start a point's note with member numbers ("1 IP", "12 TGT", "1234 RV"; untagged = everyone). Tags are the digits 1–5, each once, followed by a space or the end of the note; 5 is the planner's X column. A note like "250 KTS" stays a name.
- Left 1 to 4: member 1 to 4's route.
- Right 1 to 5: add or remove that point by hand; the number in [ ] is its place in the route.
- Bottom 1 / 2 page, bottom 4 CLR, bottom 5 ALL, left 5 DONE.
Picking a different route clears TOTs and your edits. DONE without a change keeps them.
Typed-in waypoints
- Bottom 1 ADD = latitude / longitude entry; ADD again = MGRS; a third time = cancel. CLR deletes the last digit.
- Lat / long: 13 digits DDMMmm DDDMMmm, for example 4155850415172 = N 41 55.85 E 041 51.72. N/S and E/W come from where the jet is.
- MGRS: easting and northing in the jet's own 100 km square (shown on the line), 10 digits, or 4 / 6 / 8 digits then ENT.
- The point goes in after the selected steerpoint and is flown to directly.
- Bottom 2 DEL deletes the active steerpoint: a typed-in point or one from the cartridge.
Editing the route (EDIT, bottom 4)
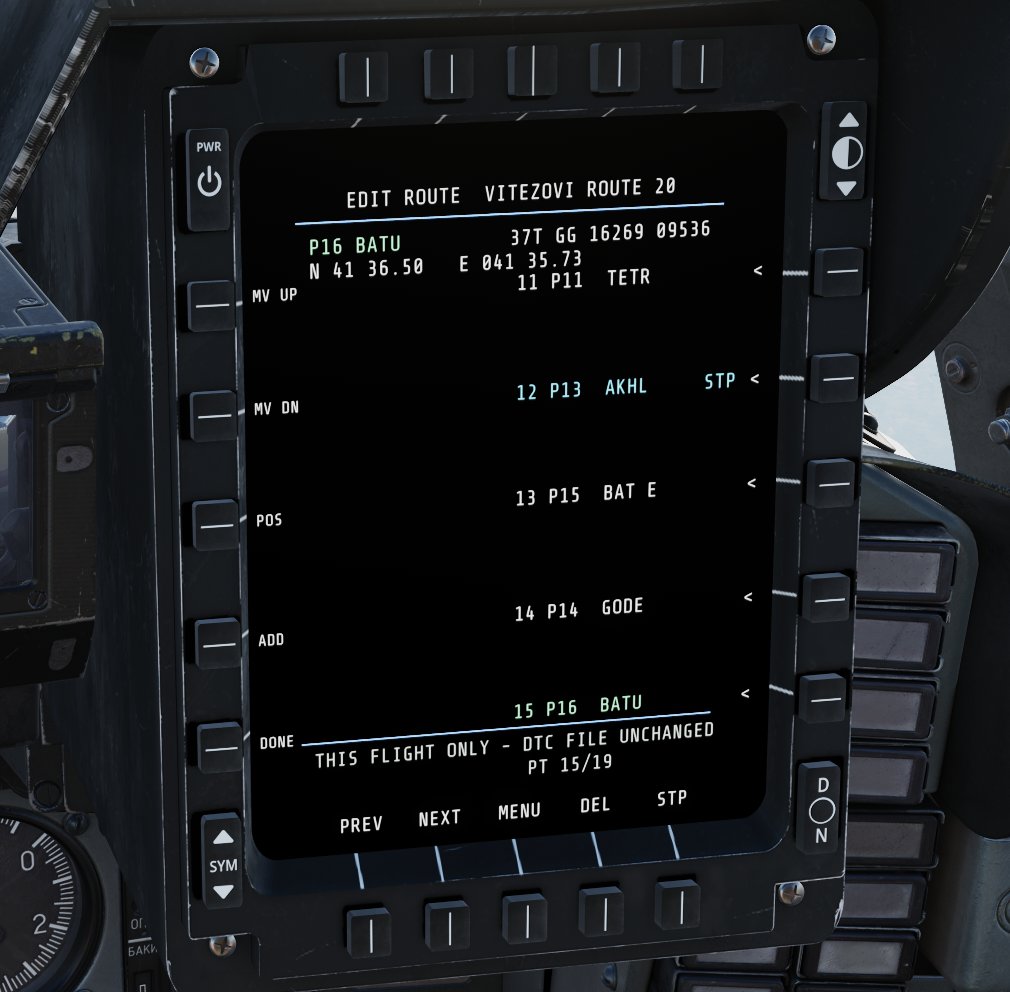
The route you fly is your own copy of the cartridge (or mission) route. EDIT changes that copy with its own cursor, so the active steerpoint stays while you edit en route. The .dtc file is never changed: LOAD (even the same cartridge), a different route on RTE or a mission restart start from the cartridge again. A short power cut keeps your edits.
| Button | Does |
|---|---|
| Right 1 to 5 | Put the cursor (green) on that point |
| Bottom 1 PREV / 2 NEXT | Page before / after (5 points a page) |
| Left 1 MV UP / 2 MV DN | Move the point one place earlier / later |
| Left 3 POS | New position for the point: lat / long, POS again = MGRS, a third time = cancel |
| Left 4 ADD | New point after the cursor (same entry) |
| Bottom 4 DEL | Press twice: delete the point under the cursor |
| Bottom 5 STP | Fly to the point under the cursor |
| Left 5 DONE | Back to NAV |
The top lines show the cursor point's name, MGRS and lat / long; the active steerpoint is cyan with STP, and moved points get a *. TOTs stay with their points when you move them.
RSBN view (right 5): the cartridge's RSBN 1 to 3 and the nearest map stations with bearing and range, NO RX beyond the radio horizon, and the jet's RSBN channel in green.
HSI, COM/NAV, FPAS, SMS, FLT and RWR
HSI (MENU left 3): a NATO-style HSI with heading bug, course and TACAN. Under the rose: the steerpoint and the next two route points with bearing, distance and ETA, as on the NAV list.
- Left 1 HDG, 2 CRS, 3 TCN: type the value on the UFCP keypad; ENT applies, CLR deletes.
- Left 4: course to the active steerpoint. Left 5: heading bug to your present heading.
- Right 1 TCN OFF: switches the TACAN pointer off again (shown while a channel is set).
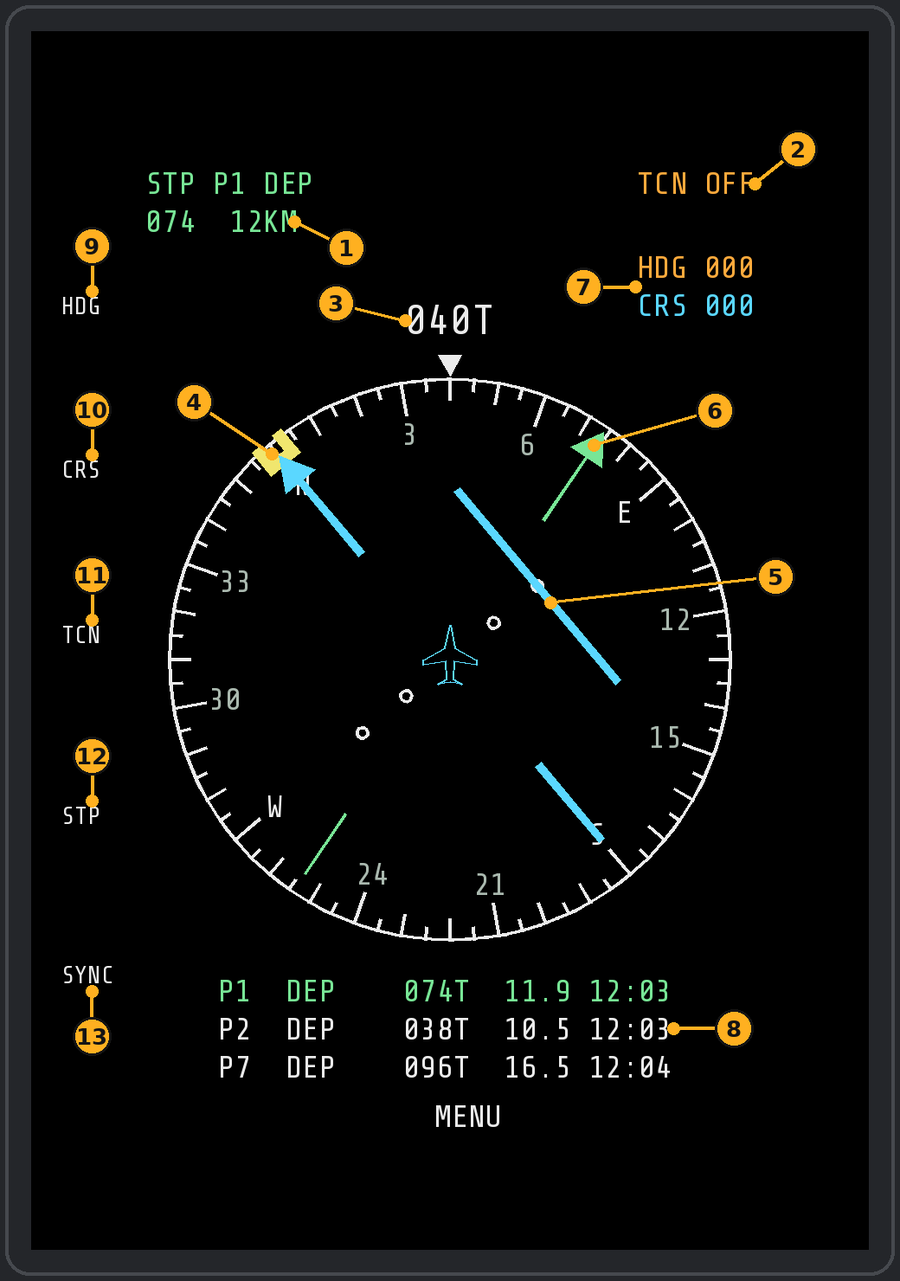
- Steerpoint bearing and range.
- TACAN state (OFF here).
- Heading readout.
- Heading bug.
- Course arrow and deviation bar.
- Steerpoint bearing pointer (green).
- HDG and CRS readouts.
- Steerpoint (green) and the next two route points: bearing, distance, ETA.
- HDG (L1): set the heading bug.
- CRS (L2): set the course.
- TCN (L3): TACAN on / off.
- STP (L4): set the course to the steerpoint.
- SYNC (L5): put the bug on your current heading.
COM/NAV (MENU left 4): the R-862 channel and frequency, the 20 presets (channels 0 to 19), RSBN / ILS / ADF / GCI channels and the nearest RSBN / PRMG stations. The R-862 is read only: the MiG-29 keeps its own preset frequencies. Since v1.8.5 the page also tunes SRS radios 2 (VHF) and 3 (UHF), see below.
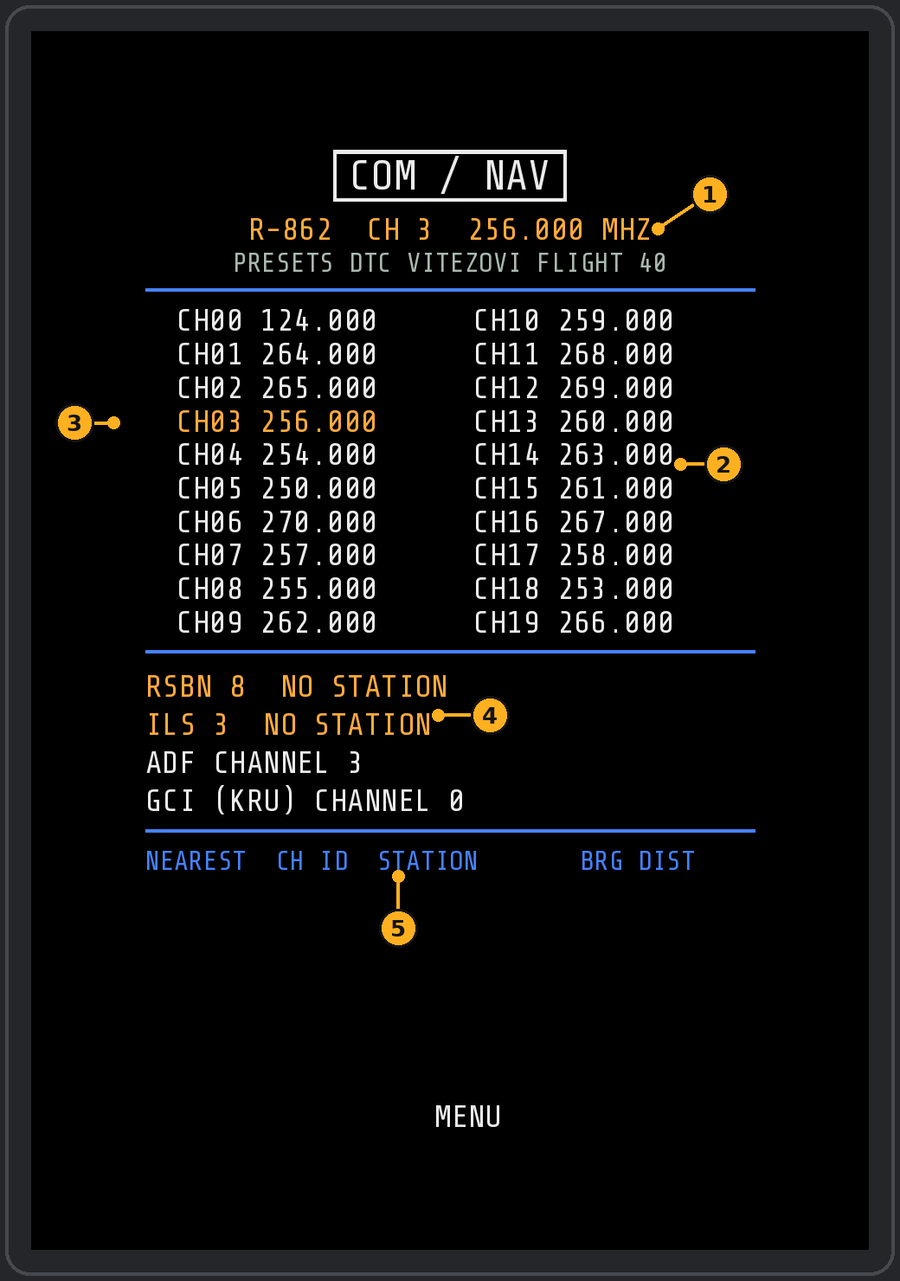
- Radio channel and frequency.
- Preset table.
- Current channel (amber).
- RSBN, ILS, ADF and GCI settings.
- Nearest stations.
SRS radios 2 and 3 (v1.8.5): in SRS the MiG-29 has three radios: radio 1 is the R-862 (SRS reads it from the cockpit), radio 2 is a VHF AN/ARC-186 (116.000–151.975) and radio 3 a UHF AN/ARC-164 (225.000–399.975). Radios 2 and 3 have no panel in the jet, so the COM/NAV page tunes them in SRS through its UDP command port (9040, the SRS client default). The three lines under the title show all three radios.
- Top 1 / 2 / 3 (R-862 / VHF / UHF): whose 20 presets the table shows (green). The R-862 stays read-only.
- On VHF or UHF: left 1 / 2 CH+ / CH− step the channel and tune SRS; left 3 / 4 VOL+ / VOL− set its SRS volume in 5 % steps (80 % at the start).
- Left 5 EDIT: type the selected channel's frequency on the UFCP keypad. The point goes after the third digit: 1248 = 124.800, 251 = 251.000. Six digits apply at once, otherwise ENT (or EDIT again).
- Right 5 SYNC: sends both radios (frequency and volume) to SRS again, e.g. after starting SRS later than DCS. Both are also sent 3 s after you spawn.
- Presets come from settings.lua (
srs_vhf_presets = {124.8, 131.0},srs_uhf_presets = {251.0, 264.0}) until you change them on the page; your changes, the channels and volumes are kept inSaved Games\DCS\Vitezovi-MFD-Addon\srs_radios.txt. - Binds (category Vitezovi MFD): SRS radio 2 / 3 channel up / down and volume up / down, on any page and with the MFD off.
- Radios 2 and 3 are SRS "expansion" radios: the SRS server must allow them. SRS does not report back, so the page shows what it last sent.
srs_radios = falsein settings.lua turns it off,srs_portchanges the port.
FPAS (MENU right 1): fuel and engines.
- Top row (v1.8.3): fuel at the active (next) steerpoint and the time to get there, e.g. AT W3 1840 KG 4:12 MIN. Worked out from the straight-line distance, your ground speed and the fuel flow measured now (TOT speeds are not used). LOW is added when you would arrive under the reserve; NO STEERPOINT when none is selected.
- Second row: time and range to the 500 kg reserve (1,102 lb in imperial). Then best range and endurance (estimates), engine RPM and EGT.
- Left 1 BINGO: type the fuel on the UFCP keypad in the units shown (kg, or lb in imperial), ENT. Below bingo, a BINGO FUEL alert shows on every page.
- Left 2 HOME: cycles through the plan's airfields and your markpoints, with fuel needed to get there and fuel on arrival. With no airfield in the cartridge and no markpoint it shows HOME -- (common on air starts): drop a markpoint over your base, or load a cartridge that has your home airfield.
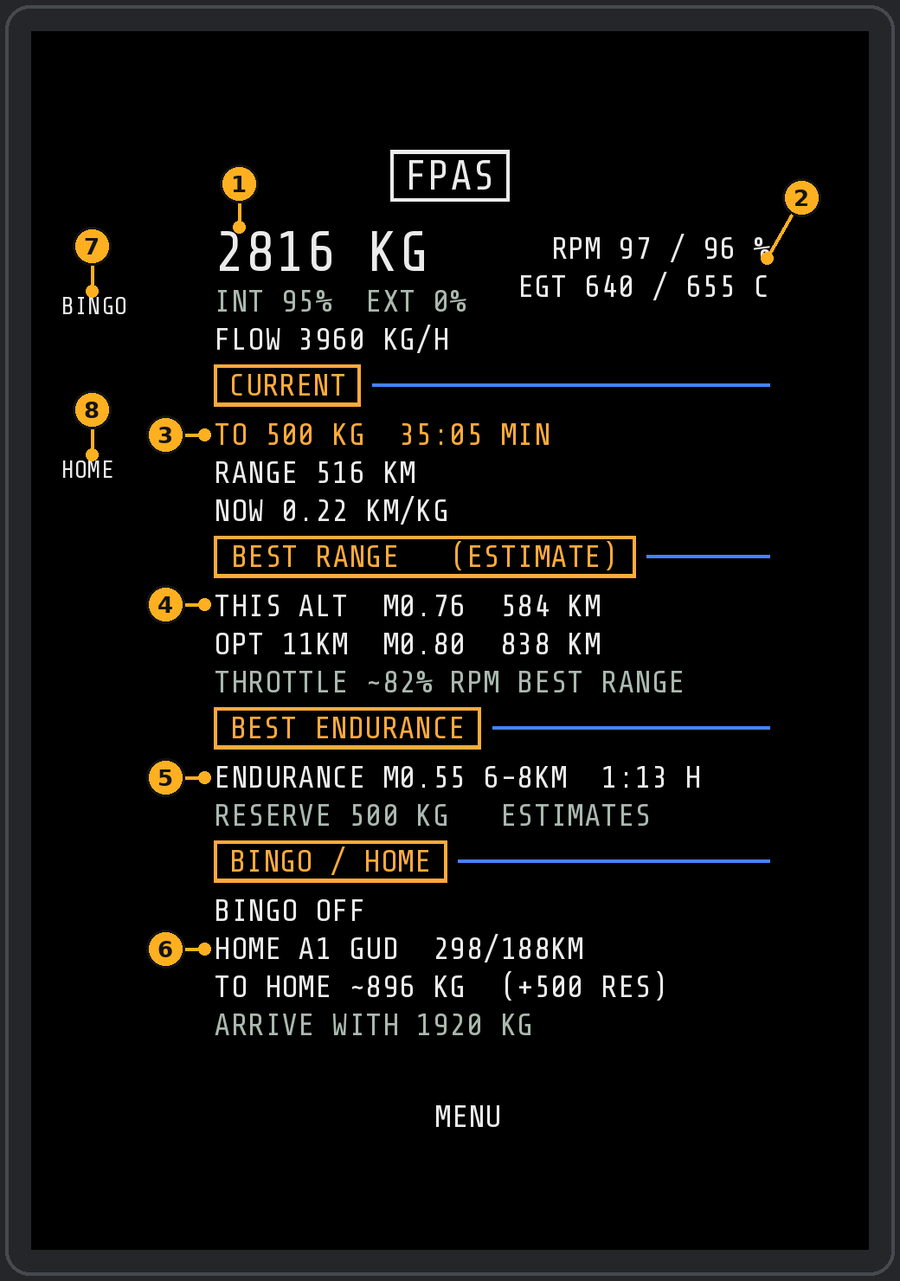
- Total fuel.
- RPM and EGT.
- At the current setting: fuel and time to the next steerpoint (top row), then time and range to the reserve.
- Best range.
- Best endurance.
- Bingo and home figures.
- BINGO (L1).
- HOME (L2).
SMS (MENU right 2): the jet seen from behind, like the stores page of the upgraded MiG-29: a line from each pylon down to its store, the store's symbol and its name. The centre tank hangs right under the jet. Amber = selected station. Under the picture: the selected station, gun rounds, chaff and flares. The selection follows the External Stores switch: INBD = stations 3 and 5; OUTBD = 2 and 6, then 1 and 7 once those are empty.
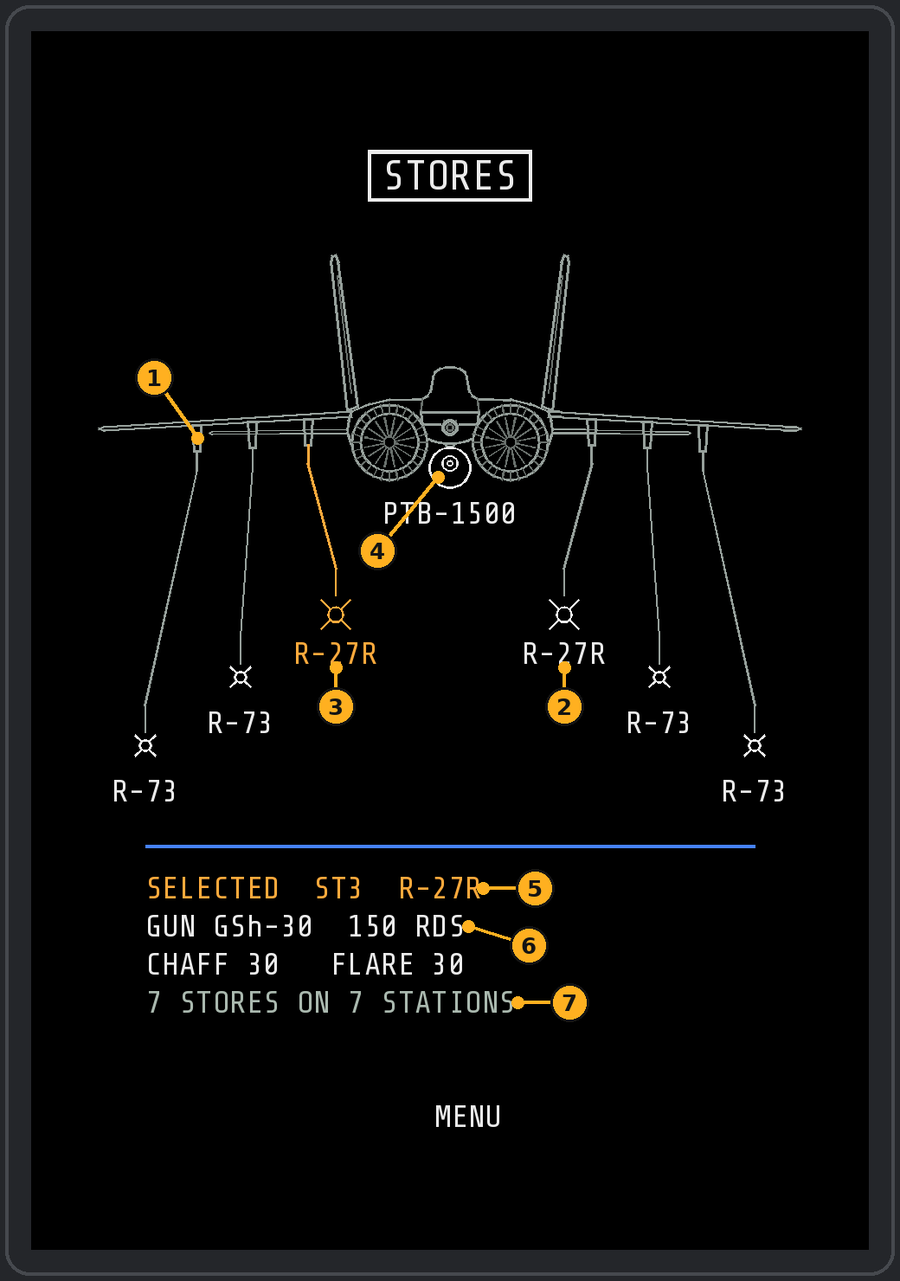
- Wing pylon, with its line down to the store.
- Store symbol and name.
- Selected station (amber).
- Centre tank, on the jet.
- Selected station and store.
- Gun rounds, chaff and flares.
- Summary of the load.
FLT (MENU right 3): your flight's positions, radar and jammer status, alive or lost.
- Left 1 ADD lists friendly aircraft (players first); pick up to 5 with the right buttons. Left 2 removes the selected member.
- Members are remembered between flights.
- Fuel and weapons of other jets are not available outside single player, so FLT shows radar / jammer / alive instead.
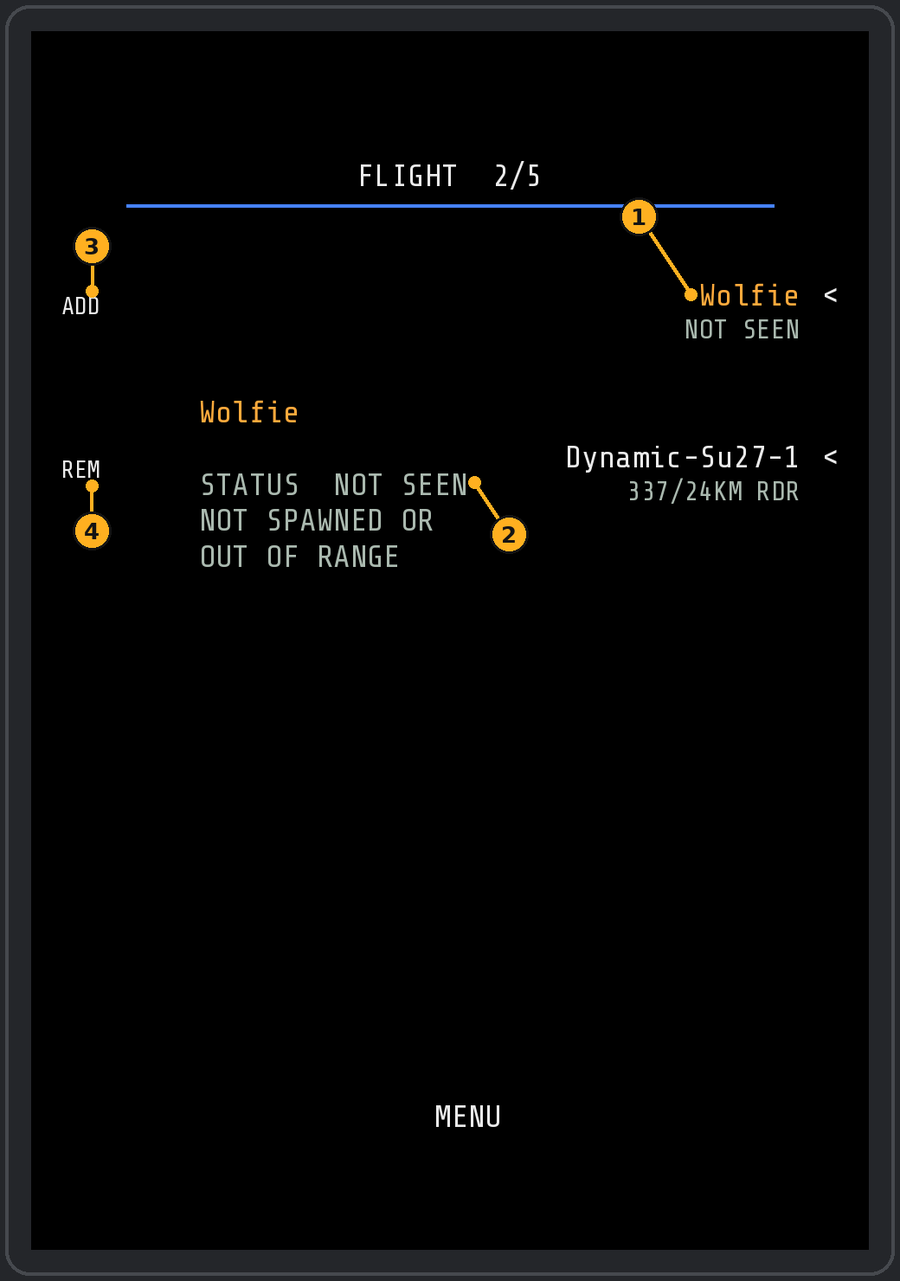
- Flight members on the right buttons.
- Status of the selected member.
- ADD (L1).
- REM (L2).
RWR (MENU right 4): the SPO-15 picture on the MFD. It shows exactly what the SPO-15 shows: sector lamps, type letters and signal strength. It does not name the radar or aircraft that is painting you.
- The main threat sits in its direction, nearer the centre the stronger it is, with its SPO-15 type letter (P Z H N F S).
- Amber = main threat, red ring = locked on you, flashing ring and banner = missile launch.
- Other threats show their direction on the outer ring.
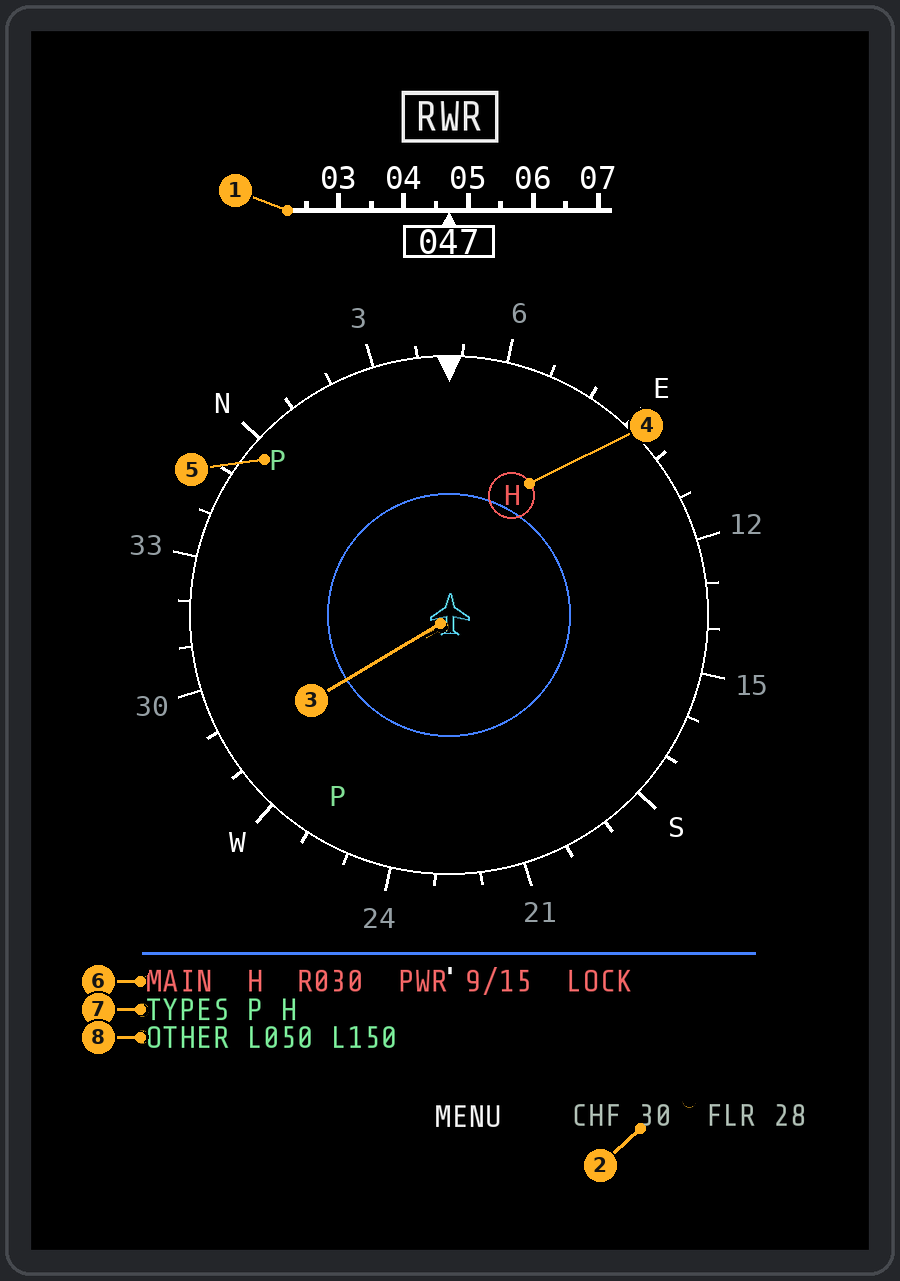
- Heading tape, the same as on the SA page.
- Chaff and flares left.
- Scope with your jet in the middle. The ring is a compass turned with your heading; the mark at the top is your nose.
- Main threat: its SPO-15 type letter in its sector, nearer the centre the stronger it is; red ring = locked on you.
- Other lit sectors on the outer ring. They carry a type letter only when one other type lamp is lit, otherwise "?".
- Main threat line: type letter, sector direction, power level (out of 15) and LOCK or LAUNCH.
- All type lamps that are lit.
- Directions of the other lit sectors (above or below for the main threat shows under these when the SPO-15 lights it).
LOFT page
LOFT (MENU right 5, v1.8.4): cues for loft (toss) attacks with unguided weapons on the active steerpoint: S-8 and S-24B rockets, FAB, OFAB, BetAB and RBK bombs. Put the steerpoint on the target, select the stations on the SMS page as usual and fly at it at a steady speed and height. The page tells you when to pull, how far, and when to fire. It is advisory only and does not fire anything.
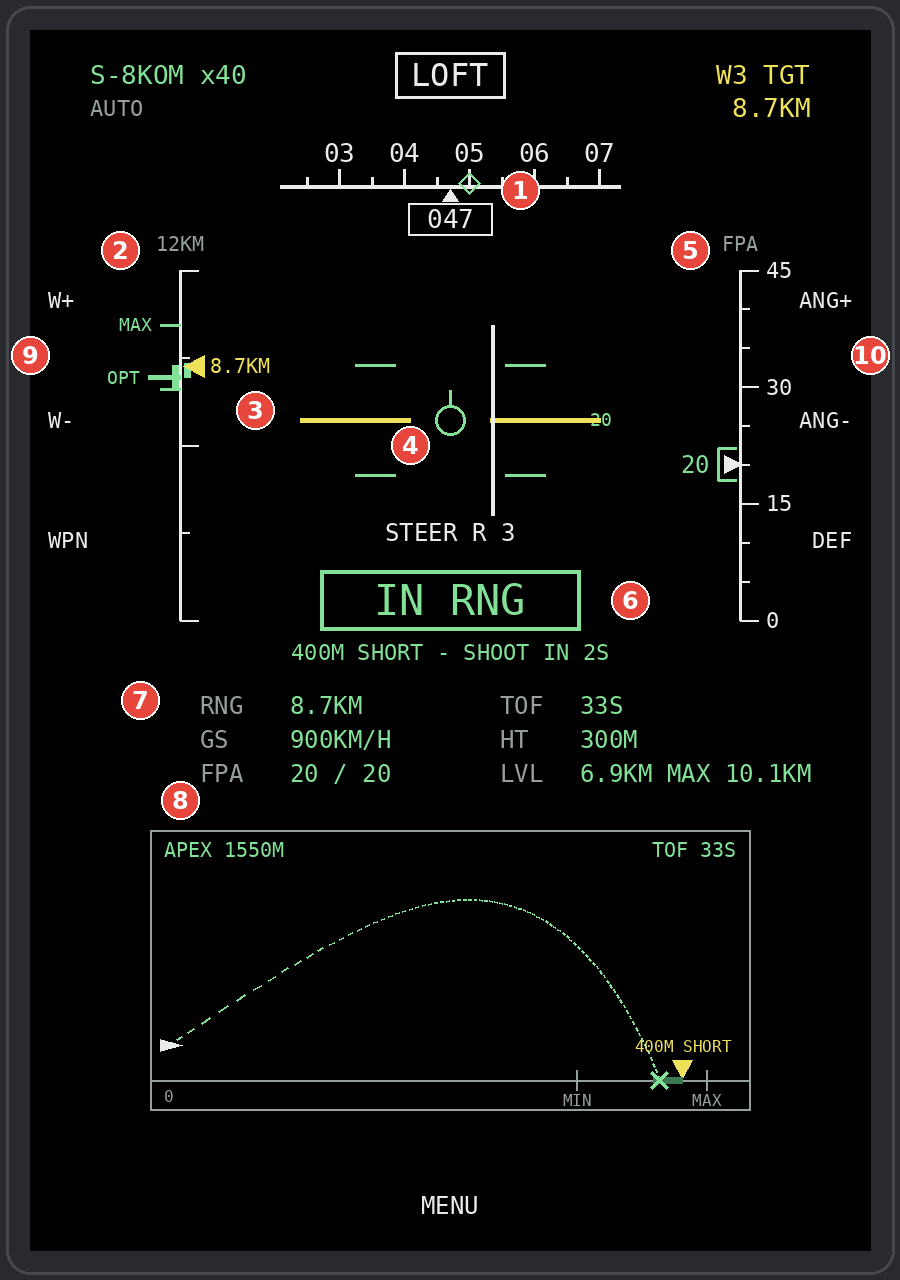
- Heading tape with the steerpoint diamond.
- Range bar. The yellow caret is your range to the steerpoint. OPT = start the pull here for the set angle, MIN = a level shot, MAX = the best angle with a 45° pull. The scale on top rounds to a whole number of km (NM in imperial). With S-8 pods and RBK a green band above OPT marks the IN RNG zone.
- Pitch ladder around the jet symbol, a line every 5°. The thick yellow line is your release angle.
- Steering bar on your ground track (fly it to the centre) and STEER L / R in degrees (ON COURSE within 1°).
- Climb angle scale with your flight path angle (white caret) and the release angle bracket. All angles on this page are the flight path angle, not the nose: in a pull the nose sits 3 to 4° higher.
- The cue (see below), with the distance short or long underneath.
- Readouts: range, ground speed, flight path angle / release angle, time of flight, height above the target, level and max range.
- Side view: your jet, the trajectory, the target triangle and the impact cross.
- W+ / W− step the steerpoint, WPN picks a weapon by hand (MANUAL; press on until AUTO to follow the SMS again).
- ANG+ / ANG− change the release angle by 1° (5 to 45°), DEF goes back to the weapon's default (rockets 20°, bombs 25°).
The cues, in order:
- PULL IN m:ss: time to the pull point at your present ground speed. The range bar caret reaches OPT at the same moment.
- PULL: pull up smoothly at about 4 g until the yellow line sits on the jet symbol. The pull point already allows for the ground and height you cover in a 4 g pull at your speed.
- HOLD 20: you are at the angle but still short; hold it.
- IN RNG (S-8 pods and RBK only): a shot fired now lands within 500 m short. Start a ripple here and it walks through the target. Underneath: the distance short and the seconds to SHOOT.
- SHOOT (green): a shot fired now lands on the steerpoint. Bombs and S-24B: within ±50 m. S-8 pods and RBK: about 60 m short to 150 m long. The page flies a fresh shot from your real speed, climb angle and height ten times a second, so a softer or harder pull still gets the right SHOOT.
- PAST RELEASE, INSIDE LOFT, OUT OF RANGE, NO STEERPOINT, NO WEAPON (amber) explain why there is no solution.
Weapons marked EST next to the weapon name (FAB-250, OFAB-250, BetAB, RBK) use estimated drag. S-8, S-24B and FAB-500 were checked against shots in DCS (within about 1 to 2 %). Wind is not in the calculation, and the target height comes from the map. If you are still pulling when SHOOT comes up and fire late, the shot goes long: finish the pull to the yellow line. Turn the page off with loft_page = false in settings.lua.
UFCP buttons and the STP switch
Three UFCP keys belong to the add-on (their labels are changed on the panel) and the keypad types values for the MFD pages.
The UFCP is powered by the Aircraft Systems Supply switch (System Power Panel, battery or ground power on first); it takes a few seconds to come on and to go off. The add-on's lines on it follow the same power.
| UFCP control | Does |
|---|---|
| MRK | Markpoint at the SA cursor, or under the jet |
| DIR (was DVR) | Fly direct to the selected steerpoint from here |
| NAV (was FLT/MENU) | NAV page; again = back |
| Keypad, ENT, CLR | Values for HSI, BINGO, TOT and typed-in waypoints |
| STP switch | With a cartridge loaded: step through its steerpoints |
With a cartridge loaded the UFCP shows the add-on's steerpoint: line 1 "STP P3", line 2 its true bearing and distance, the same numbers as the SA and NAV pages. With MSN the STP switch stays KRN's own (mission route).
Data cartridges, drawings and the DTC Planner
A cartridge is a MiG-29 .dtc file in Saved Games\DCS\DTC, made in DCS's own DTC editor or in the Vitezovi DTC Planner. Only cartridges for the current map are listed.
- One cartridge for both worlds: its 3 waypoints, 3 airfields and 3 RSBN channels drive the jet's own navigation; its route (any length) drives the NAV and SA pages.
- Member tags: start a point's note with member numbers ("1 IP", "12 TGT"); see Member routes on the NAV page. Notes hold 7 characters.
- Examples installed: VITEZOVI GCI NETWORK (intercept and escort routes for four members, ranges, FLOT and orbit tracks), VITEZOVI FLIGHT 40 (member routes), VITEZOVI ROUTE 20 (a 20-point route).
Drawings (.geo.txt)
An optional file with the same name next to the cartridge (DTC\<name>.dtc + DTC\<name>.geo.txt) adds drawings to the SA page. The DTC Planner's DRAWINGS tab writes it; Notepad works too, one drawing per line, latitude / longitude in decimal degrees, radius in km, # = comment.
| Line | Draws |
|---|---|
RING SA-11 35 42.9000 42.9000 |
Red ring with name and radius (confirmed threat) |
RING? SA-8? 12 42.5500 42.3500 |
Pink dashed ring (suspected threat) |
FLOT MAIN RIDGE 43.55 40.10 / 43.58 40.55 |
Cyan dashed line |
BORDER GEO-RUS 42.85 41.0 / 42.7 41.6 |
Grey dash-dot-dot line |
AREA CAP SOUTH 41.95 42.3 / 41.95 42.9 / 41.75 42.9 |
Cyan dashed outline with its name |
SA page right 1 GEO shows or hides them; threats seen over the datalink stay. "LOADED \
The DTC Planner makes these files for you: see Using the DTC Planner below.
Using the DTC Planner
The planner is the single file Vitezovi DTC Planner.html in the Vitezovi DTC Planner folder of the download. Double-click it and it opens in Chrome or Edge. It works offline with every DCS map built in, so you can pass the file on to squad mates as it is. It remembers the last cartridge you worked on in that browser.
It also runs online, as the WW DTC Planner: the same MiG-29 planner, plus the ones for the F-15C SIT (WW) and Su-27 Radio (WW) add-ons. Pick MiG-29A at the top; it remembers your choice.
The screen
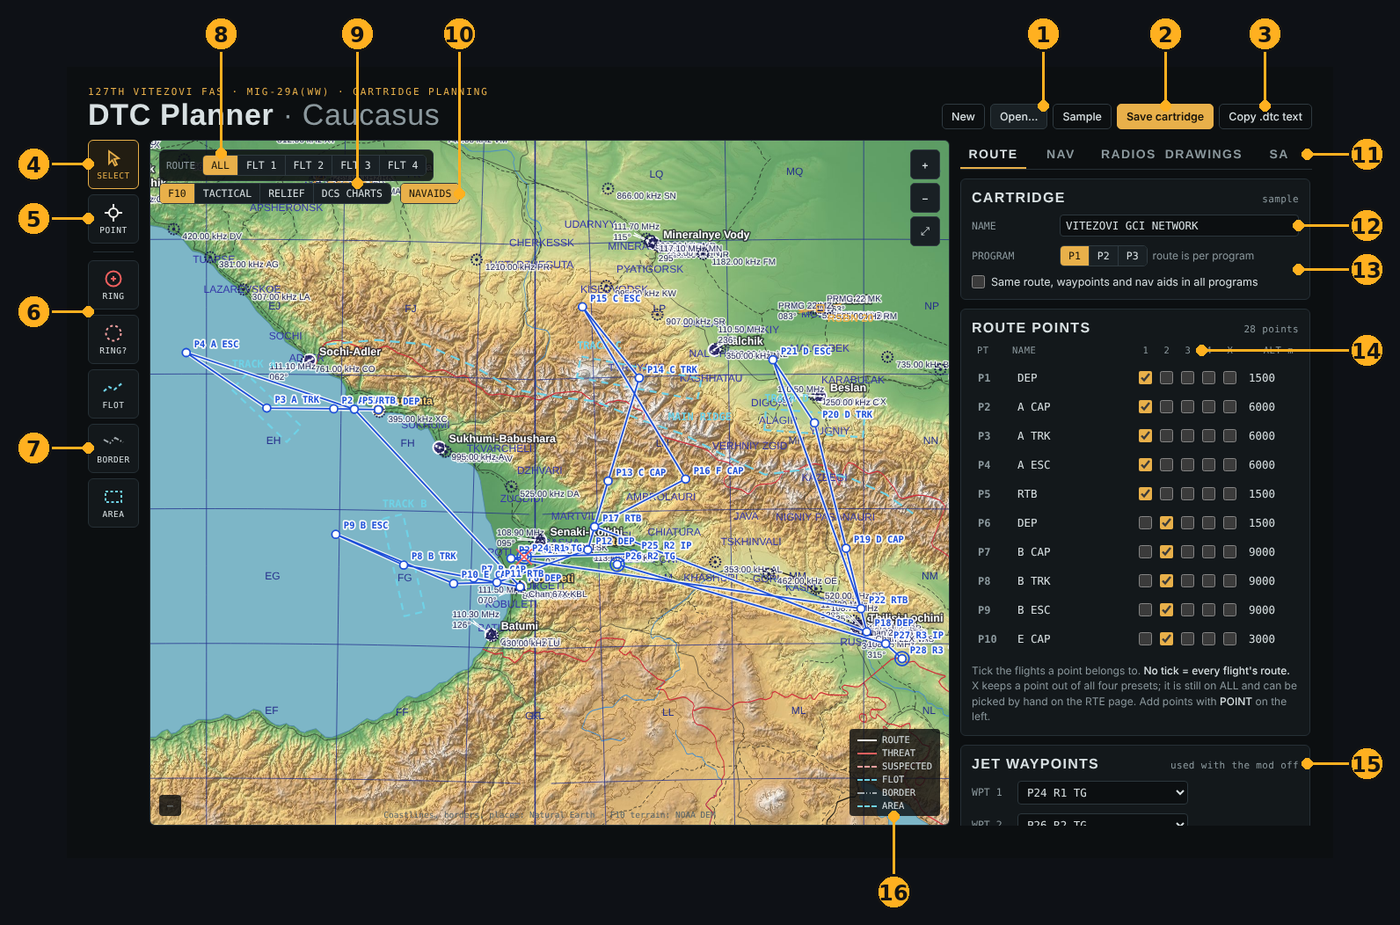
- New (choose the map and a name), Open… (load a
.dtcand its.geo.txt; select both files together) and Sample (the VITEZOVI GCI NETWORK example). - Save cartridge: writes
NAME.dtcto your Downloads folder, orNAME.zip(holdingNAME.dtcandNAME.geo.txt) when the cartridge has drawings. - Copy .dtc text: puts the cartridge text on the clipboard instead.
- SELECT: drag route points and drawings to move them; drag empty map to pan. Delete or Backspace removes what is selected, Esc deselects.
- POINT: click the map to add a route point after the selected one.
- RING / RING?: press on the threat's position and drag out the radius (the live radius shows at the bottom). RING is a confirmed threat (red), RING? a suspected one (pink, dashed). A single click makes a 20 km / 10 km ring.
- FLOT / BORDER / AREA: click corner by corner, then double-click or press Enter to finish (a line needs 2 points, an area 3). Esc cancels.
- Route filter: ALL, or only flight member 1–4's route.
- Map layers: F10, TACTICAL, RELIEF, or DCS CHARTS. For DCS CHARTS, pick your map's
RasterChartsfolder (for exampleDCS World\Mods\terrains\Caucasus\RasterCharts). It is read on your PC, nothing is uploaded. - NAVAIDS: beacons, VOR/TACAN and RSBN on the map on or off.
- Tabs for the side panel: ROUTE, NAV, RADIOS, DRAWINGS, SA.
- Cartridge name: also the file name and the name on the MFD's cartridge card.
- Program P1–P3: a MiG-29 cartridge holds three programs. With "Same route, waypoints and nav aids in all programs" ticked they share everything; untick it to edit each program on its own.
- Route points: name (keep it short), the flights it belongs to (1–4), X, and altitude in metres. No tick = on every flight's route. X keeps a point out of all four member routes; it stays on ALL and can be picked by hand on the MFD's RTE page.
- Jet waypoints: the three route points the jet's own navigation gets (WPT 1–3), used when the MFD mod is off or in old-style missions.
- Legend of the line styles.
Mouse wheel zooms; + / − and ⤢ (fit the cartridge) are at the top right of the map.
Making a cartridge, step by step
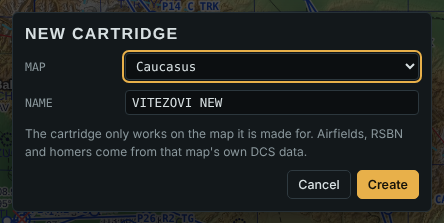
- New: choose the map and type a name, then Create. A cartridge only works on the map it is made for.
- Route: pick POINT and click the route in flying order. Then name each point and set its altitude in ROUTE POINTS.
- Member routes (optional): tick 1–4 on the points each flight member flies, and check each route with FLT 1–4 above the map.
- NAV tab: airfields and RSBN (below).
- RADIOS tab: radio presets and ADF homers (below).
- Drawings (optional): RING, RING?, FLOT, BORDER and AREA on the map, then name them in the DRAWINGS tab.
- SA tab: check what the SA page will show.
- Save cartridge and move the
.dtc(or both files from the.zip) from Downloads intoSaved Games\DCS\DTC. Restart the mission, then pick the cartridge at start-up or with NAV page right 1 LOAD.
Save refuses to write a cartridge with an empty route or a radio preset out of range, and tells you why at the bottom of the window. To change a cartridge later, Open… its .dtc together with its .geo.txt. Cartridges made in DCS's own DTC editor open too.
NAV tab: airfields and RSBN
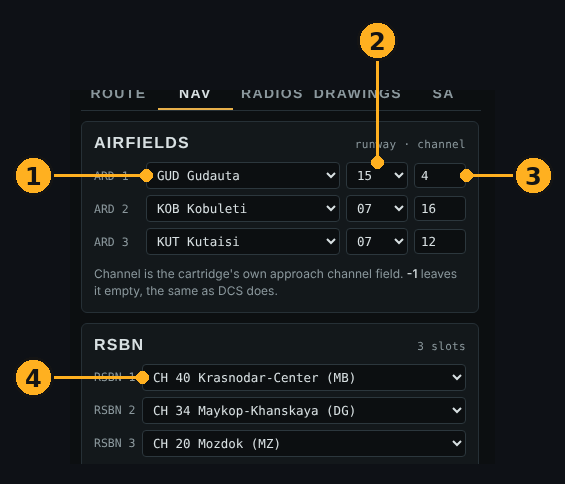
- Airfields ARD 1–3: the jet's three aerodromes.
- Runway to land on.
- The cartridge's approach channel field; -1 leaves it empty, as DCS does.
- RSBN 1–3: only the stations on this map are offered.
RADIOS tab: presets and ADF
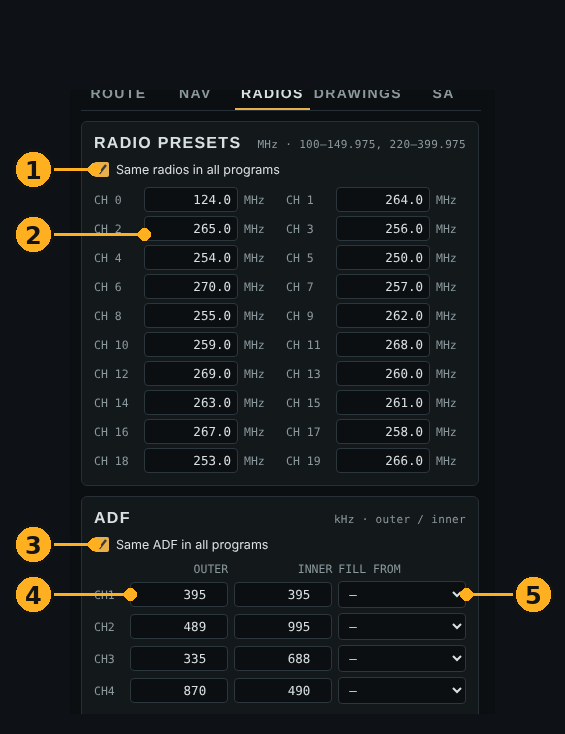
- Same radio presets in all three programs.
- Presets CH 0–19 in MHz (100–149.975 or 220–399.975). The COM/NAV page shows them in flight.
- Same ADF in all three programs.
- ADF channels 1–4: outer and inner homer in kHz.
- FILL FROM: fill both homers from an airfield approach or a beacon in one go.
DRAWINGS tab
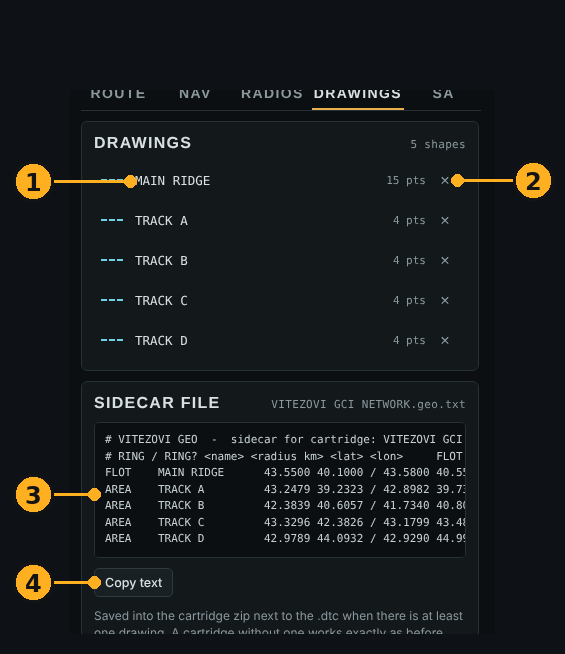
- Each drawing with its name: click the name to change it. The name is shown on the SA page.
- Delete the drawing.
- The
.geo.txtfile exactly as it will be saved (the same format as in the table above). - Copy the text, for example to paste into a
.geo.txtyou edit by hand.
SA tab: preview
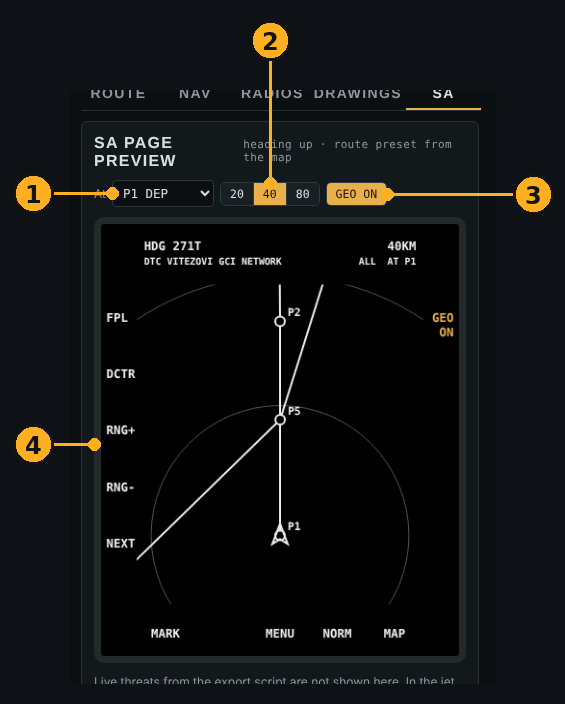
- At: view the route from this point, heading towards the next one.
- Range 20, 40 or 80 km.
- GEO on / off, like SA page right 1 in the jet.
- The SA page as it will look, heading up. Live threats from the jet's datalink are not shown here; in the jet they always stay on.
Options, settings and troubleshooting
Options (DCS Options > Special > MIG-29AM > "MiG-29 WW MFD"). They are read when a mission loads, so restart the mission after changing them. Keep KRN's own MiG29 box ticked: it switches the whole cockpit mod on.
| Option | Off / on means |
|---|---|
| Datalink | Off: SA shows only your own radar, FLT is off, the export does not scan the mission's units (saves CPU) |
| RWR page | Off: no RWR page and no launch alerts |
| Launch warnings | Off: launches show as a normal lock, no banner |
| Moving map | On: DCS's charts behind the SA page; the MAP button dims them in two steps or hides them in flight |
Brightness: top-right rocker, left click brighter, right click darker. D/N switch bottom right: left click day, right click night (separate levels). Night uses its own softer colours; threats stay bright (night_palette = false in your settings for the day colours, dimmed).
Units (v1.8.0): the MFD follows the MiG-29's own option, DCS Options > Special > MiG-29 > Avionics Units. Imperial gives NM, feet, knots and pounds of fuel on every page; Metric (Native) gives km, metres, km/h and kg. Restart the mission after changing it. To fix it for the MFD alone, put units = "imperial" or units = "metric" in settings.lua; range_units, alt_units and fuel_units change one part only. The bingo you type on FPAS is in the units shown.
Your settings (text size, keypad mapping, ranges, units, power and start-up) go into Saved Games\DCS\Vitezovi-MFD-Addon\settings.lua, one per line. The installer creates it, and updates and uninstalls never touch it. For example range_units = "nm", boot_skip = true (keeps the power button but skips the start-up screens) or power_mode = "always" (MFD always on). All setting names and their defaults are listed in Cockpit\Scripts\DL\dl_config.lua in KRN's folder; don't edit that file, because updates replace it. Restart the mission after a change.
Timing log: add perf_log = true to settings.lua to see how much time the add-on takes in your sim. Every 30 s one block goes to Saved Games\DCS\Logs\mig29dl_perf.log (the MFD, per page), mig29dl_export_perf.log (the export, with your frames per second) and mig29dl_hook_perf.log. Remove the line to switch it off; off, it costs nothing. On busy servers (a read of DCS's list of all units takes 3 ms or more) the export reads it only every 2 to 6 s, 0.5 s per ms it takes (the datalink packet still comes every second, contacts move on by their speed in between); the export log says when it switches.
Picture only when shown (v1.8.2): the MFD tells the export once a second whether the SA page (with the map), FLT or PICTURE is on screen, or an intercept is running. If not, the export sends the last picture again instead of reading the unit list; back on SA the picture is fresh within a second. settings.lua dl_pause_off_page = false switches this off.
Troubleshooting
| Symptom | Cause and fix |
|---|---|
| MFD stays dark on a cold start | Battery on, then press PWR (top-left rocker) |
| UFCP stays dark | Aircraft Systems Supply switch on (System Power Panel), then wait a few seconds |
| NO DL on the SA page | No datalink packets: the server switches off export of world objects, or the Datalink option is off. Only your own radar is shown, plus the server's EWR picture reports if it sends them |
| No cartridges listed | Cartridges are listed per map; the file must be a MiG-29 .dtc in Saved Games\DCS\DTC |
| No moving map | Check that Moving map is ticked in Options (DCS keeps an older choice) and restart the mission; some maps have no charts. Map black at the long ranges: run INSTALL.bat and answer yes to building the map textures |
| Installer reports KRN files not original | Delete KRN's folder, unzip KRN's mod again, run INSTALL.bat |
| Installer says KRN's mod has changed (newer version?) | This add-on is made for KRN V1.0.3 and never writes over a newer KRN; wait for an add-on update, or reinstall KRN V1.0.3 |
| Installer stopped with a message about antivirus, a file in use or OneDrive | Do what the message says, then run INSTALL.bat again; it finishes the job (UNINSTALL.bat undoes it) |
| Anything else | Logs in Saved Games\DCS\Logs\mig29dl_*.log; send them with your report |
The SA datalink is a simulation built from the unit list DCS exports (sensor ranges, radar horizon, terrain): DCS has no real Link 16 for the MiG-29.